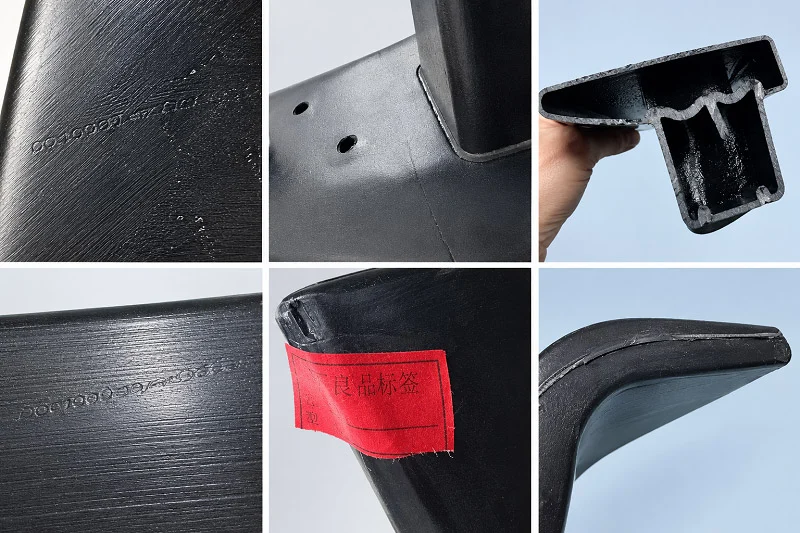
Bumper injection molding looks simple on paper. Melt the plastic, fill the mold, let it cool, and remove the finished bumper. The shop floor tells a different story. Misaligned drill holes, cracked structures, and cosmetic defects can reduce yield, delay delivery, and cut into profit margins.
The good news is that most problems have identifiable causes. Mold design, process settings, and maintenance routines all affect part quality. Find the root cause, and the right fix is often within reach.
This guide covers 9 common defects in bumper injection molding, including problems that appear during molding and post-processing. For each defect, we explain what it looks like, why it happens, and how to fix it. We also cover ways to prevent the same issue from returning. Whether you are testing a new mold or dealing with recurring problems on an existing production line, these practical steps can help improve results.
Drill Hole Breakthrough (Broken Sidewall)
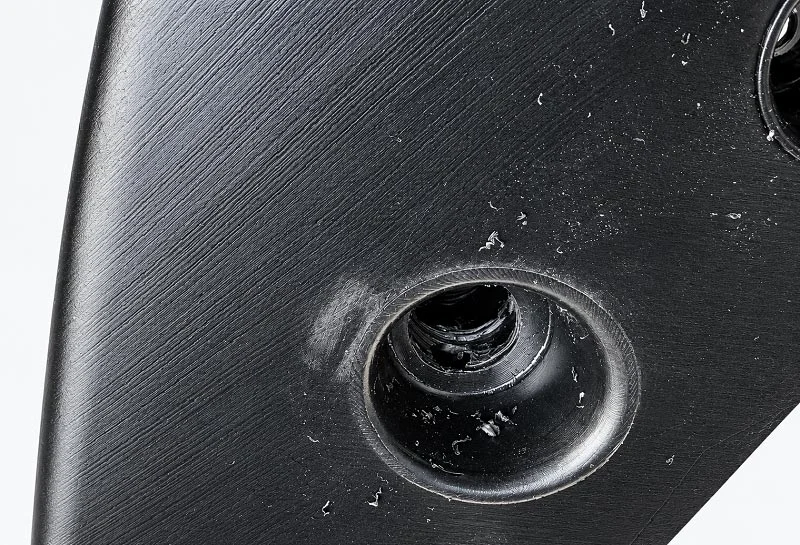
During drilling to remove process scrap, the hole center shifts out of position. The drill loses its intended path and hits the sidewall at a certain depth, breaking through the surface. The bumper is usually scrapped, with no practical way to repair it. Bumper injection molding defects like this can increase waste and production costs.
Why it happens
The root cause often lies in the mold, not the drill. The original in-mold hole center lacks precision, and the guiding clearance around the hole is too small. During machining, the drill cannot stay on track, so its path shifts and damages the sidewall. Accurate hole positioning is essential in bumper injection molding, as poor alignment can lead to costly defects.
How to fix it
Modify the mold structure to correct the hole-center datum and positioning deviation. Leave enough guiding clearance for downstream drilling. With a precise datum and sufficient clearance, the drill can follow a stable path without breaking through the sidewall. The fix starts with proper bumper injection molding mold design, not adjustments to the drill alone.
How to prevent it
Make hole-center inspections mandatory after every new mold launch and maintenance cycle. Before mass production, run a first-article drilling test to check for positional deviation and sidewall damage. Release the batch only after the results meet specifications. NOBLE, a leading manufacturing company in China, emphasizes process inspection and manufacturing control to help clients identify bumper injection molding issues before they lead to scrap.
Blocked Process Holes in Bumper Injection Molding
After molding, the air-blowing holes reserved on the bumper surface may remain exposed. These openings fail to meet appearance or assembly requirements, so each part needs additional plugging work. This is a common challenge in bumper injection molding.
Why it happens
Air-blowing holes are sometimes needed during molding to support part quality. They are not design flaws but process requirements. The problem comes when the remaining holes are sealed manually without a standardized method. This leads to inconsistent results, extra labor, and a higher risk of cosmetic defects. Process holes should be considered during bumper injection molding planning.
How to fix it
Machine cylindrical plugs from scrap material made from the same resin as the bumper. Heat the plugs and press them into the process holes with a dedicated fixture. Then grind the sealed areas until they are smooth and flush with the surrounding surface. This helps achieve a more consistent finish.
How to prevent it
Standardize plug dimensions, heating temperature, insertion pressure, and grinding requirements so every operator follows the same specifications. During mass production, inspect sealed areas for bulging, sinking, and looseness.
Short Shots at Corners and Surface Sink Marks
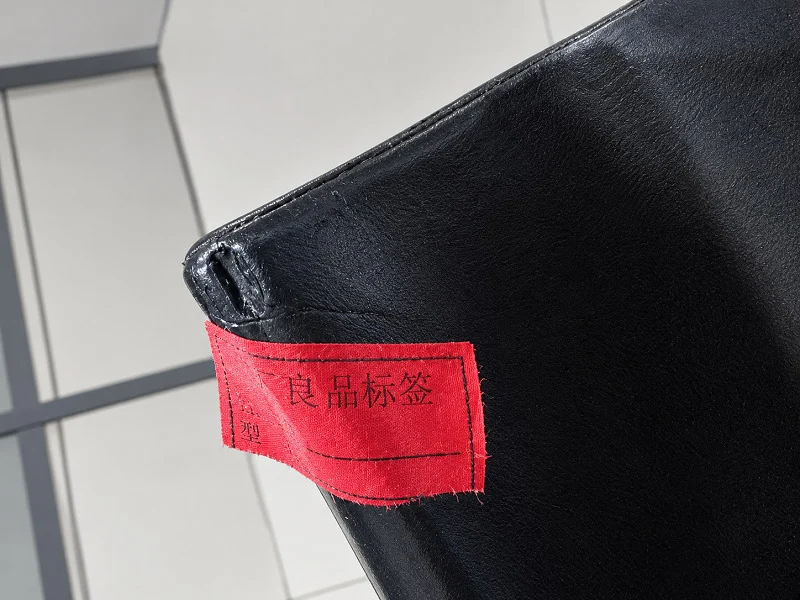
The bumper corners do not fill completely, and sink marks appear on the surface. Both defects affect appearance and may weaken the part. These are common bumper injection molding problems that often point to issues with process settings.
Why it happens
The molding parameters may not be properly matched. Air-blowing pressure may be too low, or the clamping time, material feed speed, and mold temperature may be unsuitable. As a result, the melt cannot fill and pack the corners properly, causing short shots and sink marks. Bumper injection molding needs stable, well-controlled parameters to avoid these defects.
How to fix it
Adjust the key molding parameters one at a time. Check air-blowing pressure, clamping and holding time, material feed speed, and mold temperature. Run trial shots after each adjustment and compare the results. This systematic approach helps identify the right parameter combination and improves corner filling and surface quality in bumper injection molding.
How to prevent it
Record the approved settings in a standard machine-setting work instruction. Check parameter stability during daily equipment inspections. Run new trials when the material batch or mold changes.
Cracking at the Bottom Mold Joint
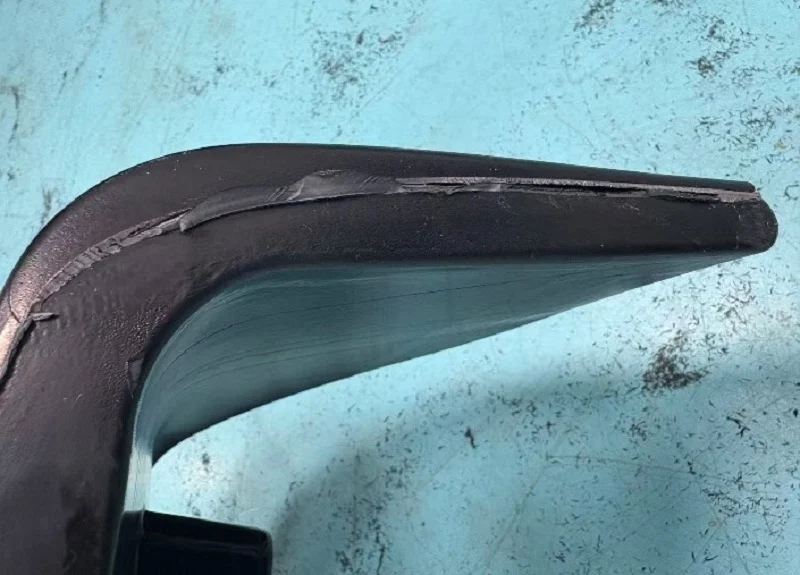
The bottom joint area cracks under load, reducing the part’s structural strength. If the bumper cannot withstand the required stress, it may fail during use. Proper joint design and process control are important for bumper injection molding durability.
Why it happens
The mold’s parting-line edge may be too sharp, or the contact surface at the joint may be too narrow. This can reduce the bonding area and create a weak weld line. When the part comes under load, the joint may crack. In bumper injection molding, mold design and joint structure directly affect part strength.
How to fix it
Rework the mold joint to remove sharp edges and improve the contact surface. Grind the edge carefully and correct the joint’s flatness. If the design allows, increase the bonding area to strengthen the weld line. Then test the revised part under the required load to confirm that the cracking issue has been resolved.
How to prevent it
Inspect the mold joint regularly for edge damage, flatness, and fit. Before mass production, test the strength of the bumper’s bottom structure under the expected load. NOBLE, a leading manufacturing company in China, includes mold checks and strength verification in its bumper injection molding workflow to identify potential weaknesses before production begins.
Cracking at Thin Mid-Section Walls
The thin-walled middle section cracks under load or splits during assembly. These defects can weaken the entire part and affect the reliability of bumper injection molding components.
Why it happens
The contact area at the mold joint may be too small, or the wall thickness in the middle section may be insufficient. This leaves the structure with limited support and reduces its ability to withstand the required load. The thin section becomes the weakest point and may crack first. Proper wall thickness is important for reliable bumper injection molding.
How to fix it
Modify the mold to increase the contact area at the joint and improve the thickness of the thin-walled section. Adjust the local structure to provide better support and strength. After the changes, produce trial parts and test them under the required load. Mold adjustments can help prevent cracking and splitting in bumper injection molding parts.
How to prevent it
easure wall thickness during first-article inspection, with extra attention to the thin middle section. Establish a regular mold maintenance schedule to detect wear before it affects part dimensions.
Surface Streaks and Lines on Bumper Injection Molding Parts
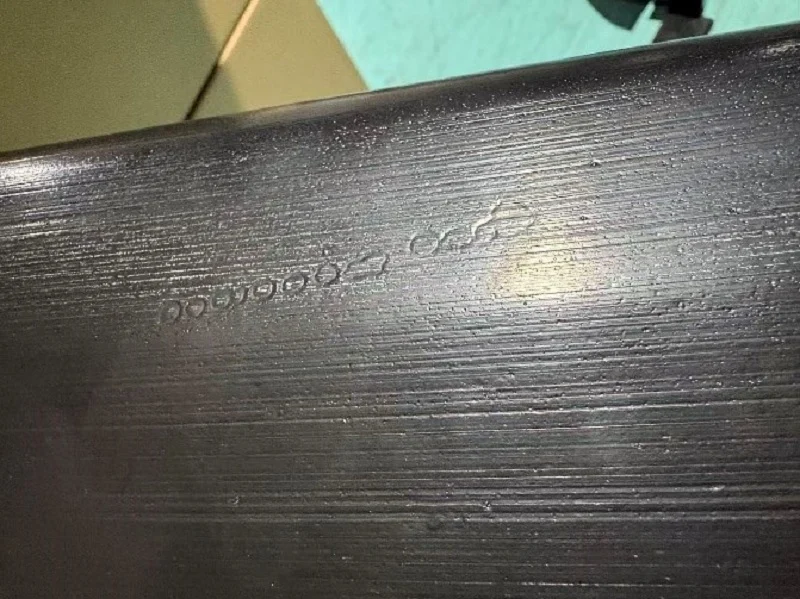
Deep streaks and lines can appear on bumper surfaces, reducing appearance quality and increasing the need for polishing and rework. These defects can also slow production and raise costs in bumper injection molding.
Why it happens
Poor mold venting can trap air inside the cavity when the mold closes. As the melt flows into the cavity, trapped air cannot escape easily and may interfere with the filling process. This can leave visible streaks or lines on the finished surface. Proper venting is essential for good surface quality in bumper injection molding.
How to fix it
Inspect the mold’s venting system and improve it where needed. Add vent channels at suitable parting-line locations or enlarge existing channels if the design allows. This helps trapped air escape during molding and reduces surface streaks. After making changes, run trial shots to confirm that the surface finish has improved.
How to prevent it
Clean the vent grooves regularly to remove debris and carbon deposits. Keep all vent paths clear, and inspect the surface of molded parts during production. Early checks can identify streaks before they lead to larger batches of defective parts. NOBLE, a leading manufacturing company in China, includes preventive mold maintenance in its bumper injection molding work to support stable production quality.
Surface Step Marks
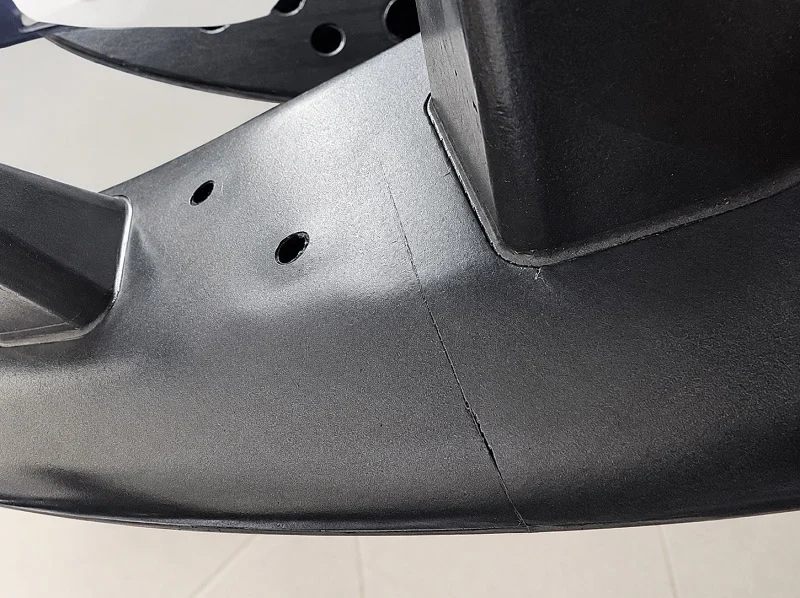
Visible ridges or steps appear on the part surface, making it feel uneven and reducing appearance consistency. These defects can affect how customers judge the quality of bumper injection molding parts.
Why it happens
The mold may not have been fitted or machined with enough precision. Curved-surface transition areas inside the mold may also have been poorly machined or polished. As a result, the surface does not transition smoothly, and the mold transfers these uneven areas to every part. Accurate machining is essential for consistent bumper injection molding quality.
How to fix it
Disassemble the mold and rework the affected areas. Machine the curved-surface transitions accurately, then polish them with precision tools to achieve a smooth finish. Run trial shots after the repair and inspect the molded surfaces. This helps confirm that the step marks have been removed and the parts meet appearance requirements.
How to prevent it
Assign a qualified inspector to check the mold after fitting, paying close attention to the smoothness of curved-surface transitions. Conduct a full first-article appearance inspection after building a new mold or repairing an existing one.
Step Marks at the Front/ Rear Mold Joint in Bumper Injection Molding
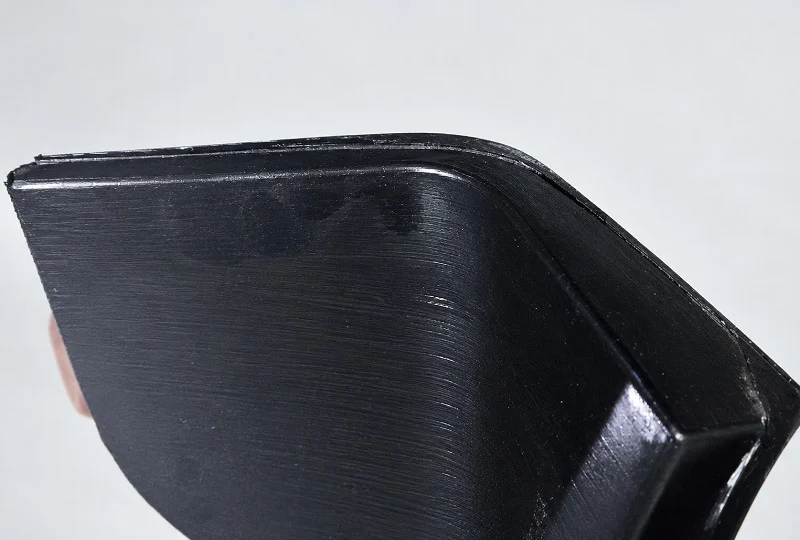
A visible step appears where the front and rear mold halves meet. This can affect both dimensions and appearance. Accurate mold alignment is essential to prevent joint defects in bumper injection molding.
Why it happens
The mold guide pins may have shifted or worn over time. This causes the front and rear mold halves to become misaligned when the mold closes. The resulting gap or offset can leave visible step marks on molded parts. Guide pin condition directly affects alignment and consistency in bumper injection molding.
How to fix it
Inspect the guide pins and realign the mold halves. Reposition or repair shifted components, and replace worn guide pins when necessary. Then check the mold’s closing alignment and produce trial parts to confirm that the joint is even and the dimensions meet specifications.
How to prevent it
Inspect guide pin alignment and wear regularly, and replace worn components promptly. Check mold alignment before production runs and after mold maintenance.
Uneven Wall Thickness in Bumper Injection Molding Parts
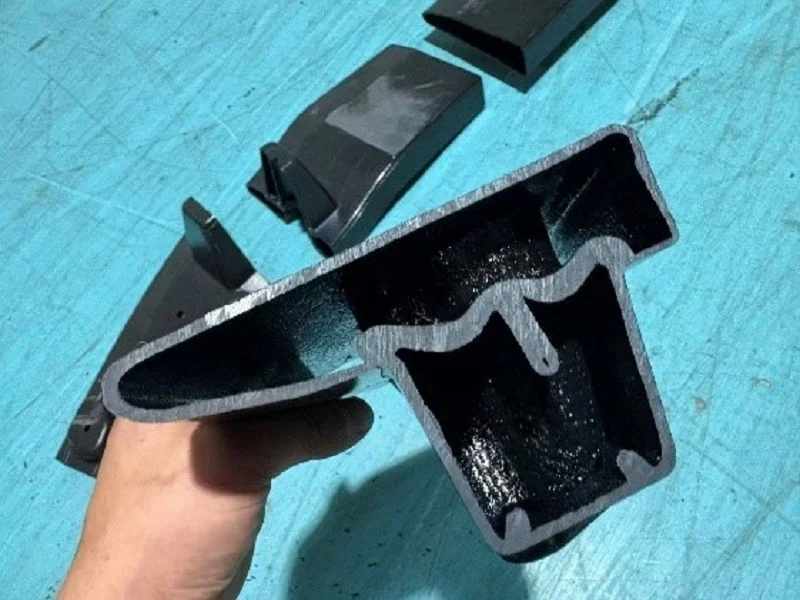
Wall thickness varies across the part, and some areas fall below specification. Thin sections are more likely to develop sink marks or crack under load. These defects often point to process control issues in bumper injection molding.
Why it happens
The material feed speed or other molding settings may be unsuitable. This can cause uneven material distribution between the upper and lower sections. Some areas become too thick, while others remain too thin. Consistent process control is essential for uniform wall thickness in bumper injection molding.
How to fix it
Use the approved sample and its validated process settings as a reference. Adjust the material feed and related parameters to improve material distribution. Measure the thinnest section to confirm that it meets the required wall thickness. Follow the proven process and verify the results with trial parts.
How to prevent it
Check part weight at set intervals to monitor consistency, and verify that the process settings remain stable. Since part weight alone cannot confirm wall thickness, cut sample parts when necessary and measure the wall directly.
Overall Control Requirements for Bumper Injection Molding
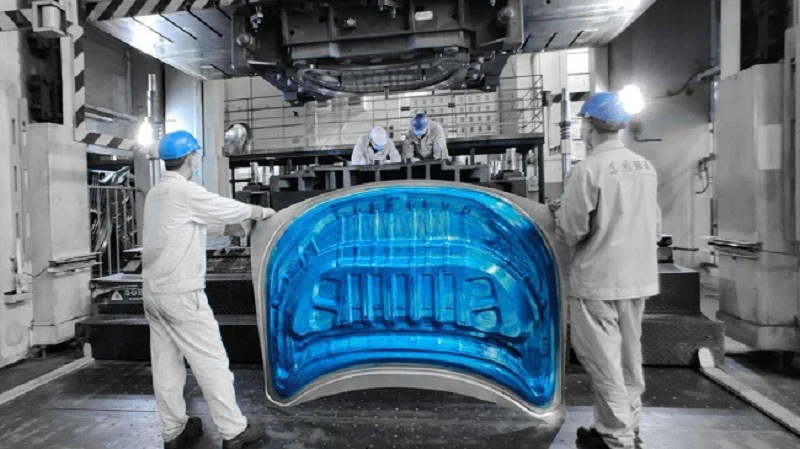
Fixing individual defects is only part of the job. Without a consistent control system, the same problems can return. Three practices help maintain quality throughout bumper injection molding production.
- Confirm the first article and validate small batches. After mold rework or parameter adjustments, inspect the first article and run a small-batch trial before starting full production. Release the batch only after the parts meet the required quality standards.
- Keep a mold maintenance log. Record each mold’s maintenance history and schedule regular inspections. Check the venting channels, mold joints, process-hole positions, and guide components. This makes maintenance more predictable and helps prevent mold problems from affecting production.
- Standardize corrective actions and process settings. Document successful fixes and approved machine settings in written work instructions. Make sure operators follow the same procedures and use the same validated parameters.
Conclusion: Bumper Injection Molding

Defects in bumper injection molding usually have specific causes. Drill breakthroughs may result from inaccurate hole positioning. Surface streaks can come from trapped air. Uneven wall thickness may be linked to poor process control. Each defect provides clues about the underlying problem, whether it involves mold design, process settings, or maintenance.
The approach is consistent across all ten defects: identify the root cause, correct the mold or process settings, and standardize the solution. First-article inspections, small-batch trials, and regular mold maintenance help ensure that corrective actions remain effective. Together, these measures make quality control more systematic and reduce the risk of repeated defects.
Effective bumper injection molding is not about expecting problems to disappear forever. It is about detecting defects early, addressing their causes, and preventing them from affecting entire production batches.
Choose NOBLE for Your Bumper Injection Molding Project

NOBLE specializes in metal and plastic processing, offering comprehensive services that cover the entire process—from design reviews and prototyping to surface treatment and final assembly. We excel at effectively integrating design requirements with practical manufacturing solutions.
Our Capabilities
Our core capabilities include CNC machining of metal and plastic parts, 3D printing, vacuum casting, surface treatment, and assembly services. In addition to production, our team provides support in design reviews, process selection, and technical problem-solving, ensuring that the delivered prototypes are immediately ready for testing, evaluation, or product demonstrations.
We are certified to ISO 9001:2015 and ISO 13485:2016, which guarantees consistent and reliable production quality and enables us to meet the stringent quality management standards required for medical device projects.
Our Services
Whether you need a single prototype, small-batch production of functional parts, or preparation for large-scale mass production, NOBLE provides robust support. The true value of rapid prototyping technology is realized when partners can deliver results efficiently. As a one-stop supplier with diverse manufacturing capabilities, we offer a full range of services from initial concept to final product assembly.
FAQs About Bumper Injection Molding Defects
What causes drill hole breakthrough in bumper injection molding?
Drill hole breakthrough usually traces back to the mold, not the drill. The in-mold hole center lacks precision, and the guiding space around the hole is too tight. The drill drifts off path and hits the sidewall—scrapping the part.
How do you fix blocked process holes in bumper injection molding?
Machine cylindrical plugs from scrap resin of the same material. Heat the plugs and press them into the holes with a dedicated fixture. Grind the sealed area flush with the base surface.
Why do short shots and sink marks appear at bumper corners?
Air-blowing pressure is too low, and clamping time, feed speed, and mold temperature are out of balance. The melt does not pack fully into the corners. The result is short shots and sink marks.
What causes cracking at the bottom mold joint?
The parting-line edge is too sharp, and the contact surface at the joint is too narrow. Too little bonding area weakens the weld line. The part cracks under load.
How do you prevent surface streaks in bumper injection molding?
Optimize the mold venting structure. Add and enlarge vent channels at key mold-joint locations. Clean the vent grooves regularly to remove debris and carbon buildup.
What causes uneven wall thickness in bumper injection molding parts?
Material feed speed is too fast. Wall thickness between upper and lower sections gets thrown off. Some areas run thick, others run thin.
How do you fix step marks at the front and rear mold joint?
Re-fit and recalibrate the mold. Adjust and correct guide pin positions. Repair worn or shifted pins so the halves align precisely and close tightly.
What is the best way to prevent recurring bumper injection molding defects?
Identify the root cause. Correct the mold or parameters. Standardize the fix in written work instructions. Combine first-article checks, small-batch validation, and a real mold maintenance log.
Why choose NOBLE for bumper injection molding?
NOBLE—a leading manufacturing company in China—brings deep experience to bumper injection molding. Their team understands these defects and knows the fixes. Their service capabilities help clients avoid common pitfalls and achieve higher yield.
How does NOBLE support quality control in bumper injection molding?
NOBLE applies first-article confirmation, small-batch validation, and documented maintenance routines. Their team verifies hole positions, wall thickness, and joint alignment before production. The result is consistent quality across runs.