Injection molding changes raw plastic into exact shapes. It does this by pushing melted plastic into a mold. You can find these parts in many things you use every day. They are in cars and medical tools. This process is important because it helps make many items faster.
| Metric | Value |
|---|---|
| Market Value in 2023 | $191.0 billion |
| Estimated Value in 2024 | $192.7 billion |
| Projected Value in 2029 | $235.7 billion |
Injection molding is growing because of new technology. Automation and better materials help it improve. This keeps factories working well and helps them create new things. Learning about Injection Molding Principles helps you design and make things better.
Injection Molding Essentials
- Injection molding melts plastic and shapes it into exact parts fast with little waste.
- There are four main steps: clamping, injection, cooling, and ejection.
- If you control temperature, pressure, and cycle time, the parts are better and have fewer problems.
- Injection molding saves money for big orders because each part costs less after making the mold.
- You can pick from many plastics and designs to make strong, bendy, and safe things.
- Good mold design and care stop problems like warping, sink marks, and flash.
- Careful quality checks and safety rules help make sure parts are always safe and work well.
- Injection molding is used a lot in cars, electronics, medical tools, and packaging.
Overview
Definition
Injection molding is a way to make things from plastic. You heat plastic pellets until they melt. The melted plastic goes into a mold using high pressure. A screw inside the barrel mixes and moves the plastic. The mold is made from steel or aluminum. The plastic cools and gets hard in the mold. This gives you the shape you want. You can make small or big parts this way. Some molds make many parts at once. You can change settings like pressure and temperature. This helps each part turn out right. Factories use this method to make plastic parts that are all the same.
Importance
You find injection-molded parts in many places. They are in cars and hospitals. This process makes lots of parts fast and with little waste. Factories like it because it saves time and money. If you make the process better, you save more money. You also get more parts and better quality. Look at this table to see how it helps:
| Metric | Competitor Injection Molding | All-Plastics Injection Molding |
|---|---|---|
| Initial Investment | $245,000 | $245,000 |
| Shot Life (Million) | 1 | 2 |
| Total Pieces (Million) | 16 | 16 |
| Cost per Piece | $0.050 | $0.055 |
| Revenue Generated | $800,000 | $880,000 |
| Profit | $1,600,000 | $1,760,000 |
| Additional Savings | $245,000 | $0 |
| Total Return | $1,845,000 | $1,760,000 |
| Extra Benefits | $0 | $85,000 |
Making injection molding better means more parts and more money. Using strong molds and good settings helps a lot. You get more use from each mold. You also have less time when the machines stop working.
History
Injection molding has been around for a long time. It started in the late 1800s. The process got better as new machines came out. In 1968, Milacron made its third injection molding machine. That machine is still around today. It is shown as a part of the company history. The old order and repair records show its importance. Companies like Milacron helped make the rules for the industry. As machines improved, injection molding got faster and more exact. Now, it is a big part of making things today.
Injection Molding Principles
Understanding Injection Molding Principles helps you make high-quality plastic parts. You need to know each step in the process, the main machine components, and how process parameters affect your results.
Process Overview
You can break down the injection molding process into four main stages. Each stage plays a key role in shaping the final product.
Clamping
The process starts with clamping. The machine presses the two halves of the mold together. This step keeps the mold closed and ready for the next stage. The clamping unit uses a strong force to prevent leaks when you inject the plastic.
Injection
Next, you feed plastic pellets into the machine. The screw inside the barrel heats and melts the pellets. The molten plastic moves forward and fills the mold cavity under high pressure. The runner system, which includes the sprue, runner, and gate, guides the flow into the mold. This step forms the basic shape of your part.
Cooling
After injection, the plastic cools inside the mold. Cooling takes up about half of the total cycle time. The mold has cooling channels that help remove heat quickly. As the plastic cools, it hardens and takes the shape of the mold cavity. You must control the cooling time to avoid defects like warping or sink marks.
Ejection
Once the part cools and solidifies, the mold opens. Ejector pins push the finished part out of the mold. The cycle then repeats for the next part. Ejection must be smooth to prevent damage to the part.
Tip: Most injection molding cycles last between 30 and 90 seconds. Cooling is the longest stage, so optimizing it can improve your production speed.
Machine Components
You need to understand the main parts of an injection molding machine. Each component has a special job in the process.
Hopper
The hopper stores raw plastic pellets. You can also add colorants or other additives here. The hopper feeds the pellets into the barrel as needed.
Barrel
The barrel is a heated tube where the plastic melts. Heaters along the barrel keep the temperature just right. The barrel prepares the plastic for injection.
Screw
The screw sits inside the barrel. It rotates and moves forward to mix, melt, and push the plastic toward the mold. The screw also builds up the pressure needed for injection.
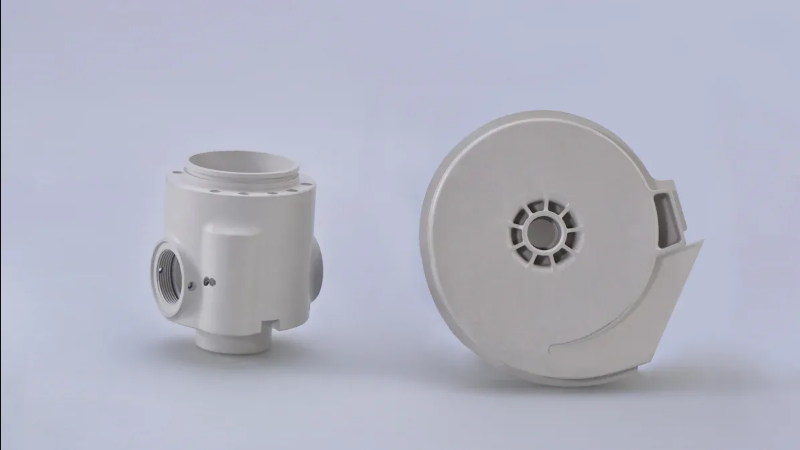
Mold
The mold shapes the final product. It is made from steel or aluminum and has two halves. The mold contains the cavity, cooling channels, and ejection system. You can design molds for simple or complex parts.
| Component | Function |
|---|---|
| Hopper | Stores and feeds plastic pellets |
| Barrel | Melts and prepares plastic for injection |
| Screw | Mixes, melts, and pushes plastic |
| Mold | Shapes and cools the final product |
Process Parameters
You must control several key process parameters to get the best results. These settings affect both quality and efficiency.
Temperature
You need to set the right temperature for the barrel and the mold. Melt temperature affects how well the plastic flows and mixes. Mold temperature controls cooling speed and part quality. If you set the temperature too high or too low, you may see defects like warping or stress cracks.
Pressure
Injection pressure pushes the molten plastic into the mold. Packing or holding pressure keeps the mold filled as the plastic cools and shrinks. If you use too much or too little pressure, you can get defects such as short shots or sink marks.
Cycle Time
Cycle time is the total time for one complete process, from clamping to ejection. Most cycles last 30 to 90 seconds. Cooling time is the biggest part of the cycle. You can improve efficiency by reducing cooling time without harming part quality.
Note: Studies show that careful control of temperature, pressure, and cycle time leads to fewer defects and better part consistency. Using data and predictive models helps you set the best parameters for each job.
Injection Molding Principles guide you through each step, from loading pellets to removing finished parts. When you understand the process, machine components, and parameters, you can make strong, precise, and reliable products every time.
Advantages of Injection Molding
Efficiency
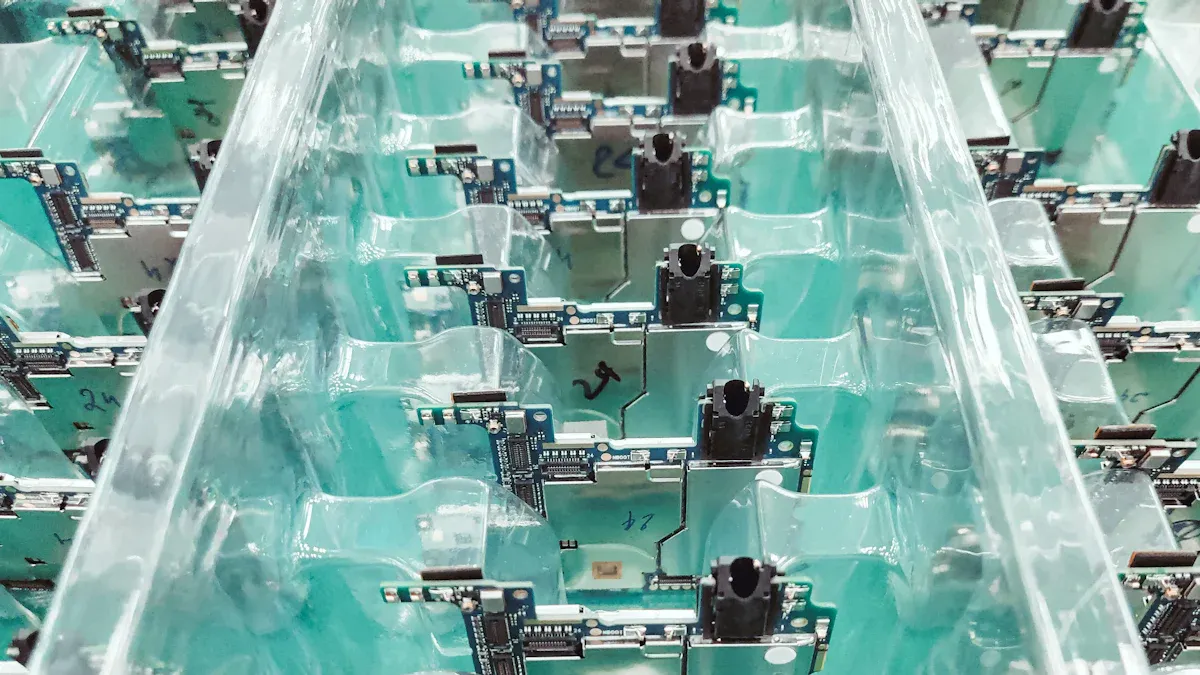
You can make thousands of identical parts quickly with injection molding. The process uses automated machines that work with little human help. Once you set up the mold, the machine repeats the same steps over and over. This means you get a steady flow of finished parts. You can run machines day and night to meet high demand. Most cycles take less than a minute, so you save time on each part. This high speed helps you finish big orders fast. You also reduce mistakes because the process is controlled by computers. When you need to make many parts, injection molding gives you the speed and reliability you want.
Cost-Effectiveness
Injection molding helps you save money when you make large numbers of parts. The main cost comes from making the mold. After you pay for the mold, each part costs much less to produce. As you order more parts, the cost per part drops quickly. Look at this table to see how the cost changes as you make more units:
| Units Ordered | Total Cost ($) | Cost-per-Unit ($) |
|---|---|---|
| 1 | 5,000.50 | 5,000.50 |
| 2 | 5,001.00 | 2,500.50 |
| 1,000 | 5,500.00 | 5.50 |
You can see that making just one or two parts is expensive. When you make 1,000 parts, the cost per part drops a lot. If you compare injection molding to 3D printing, you find that injection molding becomes cheaper after about 50 to 60 parts. The chart below shows how the cost per unit changes for steel molds, aluminum molds, and 3D printing as you make more parts:
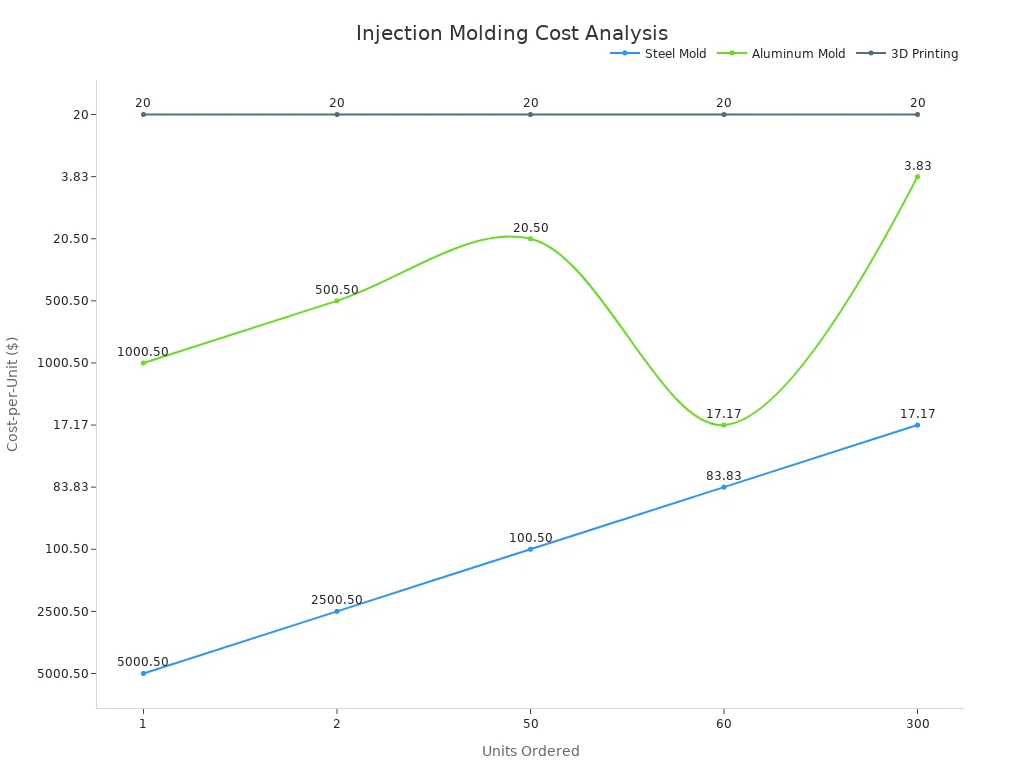
You also have ways to lower costs even more. You can work with your mold maker to keep the design simple. You can choose the right equipment size for your needs. These steps help you get the best value from your investment.
Design Flexibility
Injection molding gives you many options when you design a part. You can choose from hundreds of plastic materials to match your needs. You can change the shape, size, and surface finish to fit your product. Here are some ways injection molding supports design flexibility:
- You can pick from many plastic resins with different strengths and looks.
- You can set the wall thickness to make parts strong and light.
- You can add ribs and bosses for extra support without adding much weight.
- You can use tight tolerances for parts that must fit together well.
- You can design special features like parting lines, gates, and ejector pins to improve quality.
- You can test your design with a single-cavity mold and then switch to multi-cavity molds for bigger orders.
- You can choose from many surface textures and finishes to get the look you want.
- You can get feedback from experts to make your design easier to mold.
With these choices, you can create parts that work well and look good. You can also change your design as you go, making injection molding a smart choice for new products.
Consistency
You want every part to be the same. Injection molding helps you do this. The process uses special quality control tools. Computers watch each step as it happens. Cameras look for problems in every part. Sensors check things like heat and pressure. If something changes, the system fixes it fast. This stops mistakes and keeps parts within limits.
You also use Statistical Process Control to watch for changes. It collects data while you make parts. This helps you find problems early and fix them. You can trust that each part will match the others.
Keeping the melt temperature steady is very important. If the heat changes, the plastic moves differently. This can change the part’s size or shape. By checking and controlling the melt temperature, you keep things steady. Sensors in the mold also check pressure and heat. These tools help you make small changes as you work. You get parts with the same size, shape, and strength every time.
Tip: Good process control means fewer mistakes and less waste. You save money and keep your customers happy.
Material Versatility
Injection molding lets you pick from many materials. You can use thermoplastics like ABS, Nylon, Polycarbonate, Polyethylene, and Polypropylene. You can also use thermosets like Epoxy and Phenolics, or elastomers like Silicone and Nitrile Rubber. Each material has its special features. Some are strong, some resist heat, and some bend without breaking. You can make parts for cars, medical tools, food containers, and electronics.
- You pick materials for strength, flexibility, or safety.
- You can use materials that are safe for food or medicine.
- You can choose eco-friendly options like biodegradable PLA or bio-based PE.
- You change the melt temperature and mold design for each material.
- You check for purity and control moisture to keep quality high.
- You can mold materials with different flow and shrink rates.
This means you can make many kinds of products. You can meet tough safety or environmental rules. You can also make parts with special looks or textures.
Waste Reduction
You want to use your materials well and make less waste. Injection molding helps you do this. Most of your raw material becomes finished parts. You can track your progress with these key numbers:
| Metric | Description | Industry Average (%) | Optimal Target (%) |
|---|---|---|---|
| Production Efficiency Rate | How well you turn raw materials into finished products. | 75% | 90% |
| Scrap Rate | How much material do you throw away or rework due to defects? | 5% | 2% |
| Machine Downtime | Time your machines are not running, it can lead to more waste. | 10% | 5% |
You can use lean manufacturing to cut waste even more. Lean methods help you remove steps that do not add value. You make cycle times better and lower scrap rates. You also use more recyclable materials. These steps help you protect the environment and save money. When you focus on waste, you help your business and the planet.
Common Plastic Injection Molding Materials
Thermoplastics
Thermoplastics are used a lot in injection molding. You can melt and shape them again and again. These plastics are strong and flexible. They do not cost too much. That is why they work for many products.
PP
Polypropylene (PP) is light and strong. You see it in food boxes, car parts, and medical tools. PP does not let chemicals hurt it. It does not soak up much water. It bends but does not break. You can recycle PP, so it is good for the Earth. Reports say PP is strong and cheap for making lots of parts.
ABS
Acrylonitrile Butadiene Styrene (ABS) is tough and strong. You find ABS in car dashboards and toys like LEGO. It is also used in cases for electronics. ABS does not get hurt by chemicals. It can take hits without breaking. Studies show you can change how ABS acts by changing pressure and heat.
PE
Polyethylene (PE) comes in two main kinds. One is HDPE, which is hard and strong. The other is LDPE, which is soft and bends easily. HDPE is used for bottles, pipes, and medical equipment. LDPE is used for bags and squeeze bottles. Both types keep out water and do not let electricity pass. Research shows PE stays strong after many uses.
PC
Polycarbonate (PC) is clear and very strong. You see PC in safety glasses and car lights. It is also in electronic parts. PC does not break when dropped or heated. You also find PC in medical and sports gear. Studies say PC keeps its shape and blocks electricity well.
Thermosets
Thermosets get hard when you heat them. After that, you cannot melt or change them. You use thermosets for parts that must stand up to heat and chemicals.
Epoxy
Epoxy resins stick things together and fight off chemicals. You see epoxy in electric parts, glue, and coatings. Epoxy can take high heat and does not change shape. You use it for parts that need to last a long time.
Phenolic
Phenolic resins do not burn or melt. You find them in switches, handles, and car parts. Phenolic works well in hot or rough places. Reports say phenolic is strong and does not soak up water.
Note: Thermosets like epoxy and phenolic are stronger and take more heat than most thermoplastics. But you cannot recycle them after they are made.
Elastomers
Elastomers are soft plastics that stretch and snap back. You use them for seals, gaskets, and soft handles.
| Elastomer Type | Flexibility | Heat Resistance | Common Uses |
|---|---|---|---|
| TPE | High | Up to 100°C | Seals, grips, toys |
| TPV | Medium | Up to 120°C | Automotive parts, gaskets |
| TPU | High | Up to 80°C | Wheels, flexible tubing |
| LSR | Very High | Extreme | Medical, baby products |
Elastomers like TPE and TPU stretch like rubber but are easy to mold. You pick elastomers for things that must bend or keep water out. Some, like LSR, are safe for food and medical use because they withstand heat and stay safe.
Tip: When you choose a material, think about how strong, bendy, or heat-proof your part should be. This helps you pick the best plastic for your product.
Selection of Injection Molding Materials
Picking the right material is a big step in injection molding. You want your product to work well and last a long time. The material you choose also needs to follow safety rules. What you pick changes how your part looks and works.
First, think about what your product must do. Ask yourself some questions. Does it need to be strong or bendy? Will it get hot or touch chemicals? Should it be safe for food or medical use? Do you want it shiny or a special color?
You should also check if the material is easy to mold. Some plastics fill small spaces better. Others shrink more when they cool down. If your material fits your mold and design, you get better parts.
Here are the main things to check when you pick a material:
- Product Requirements: Make sure the material is strong and flexible enough. Check if it can handle heat and chemicals.
- Material Properties: Learn about plastics like ABS, polycarbonate, nylon, or polypropylene. Each one has good and bad points.
- Cost and Availability: Pick a material that fits your budget and is easy to find. Sometimes, a cheaper plastic works just as well.
- Molding Process Needs: Check if the material works with your machine. Look at the melting point, flow, and shrinkage.
- Environmental Impact: Choose materials that you can recycle or that break down if you want to help the planet.
- Regulatory Compliance: Make sure your material follows all safety rules. This is extra important for food, medical, or kids’ products.
- Post-Processing: Think about if you need to paint or finish the part after molding.
Tip: Ask experts or suppliers for help. They can help you find the best plastic for your needs.
Here is a table to help you compare what matters:
| Selection Factor | What to Consider |
|---|---|
| Mechanical Properties | Strength, toughness, flexibility |
| Thermal Properties | Melting point, heat resistance |
| Chemical Resistance | Exposure to oils, acids, or cleaners |
| Cost and Availability | Price per pound, local supply |
| Moldability | Flow, shrinkage, ease of processing |
| Environmental Impact | Recyclability, biodegradability |
| Regulatory Compliance | FDA, RoHS, or other standards |
| Post-Processing | Painting, plating, surface finishing |
You can make better choices by following these steps. Good material selection saves money and avoids problems. It helps you make products people trust. Always test your material before making lots of parts to be sure it works.
Precautions
Defect Prevention
Warping
Warping happens when parts cool unevenly. You see this when a part bends or twists after it leaves the mold. To stop warping, keep the wall thickness the same across your part. Use gradual cooling instead of fast cooling. This helps the plastic shrink evenly and keeps your part flat. You should also check the mold temperature and make sure it matches the type of plastic you use.
Sink Marks
Sink marks look like small dents on the surface of your part. They form when thick sections cool more slowly than thin ones. To prevent sink marks, design your part with walls that are not too thick. Keep the wall thickness between 1.2 and 3.0 mm for most plastics. Add ribs or bosses only if needed, and make them 60-80% of the wall thickness. This keeps the surface smooth and strong.
Short Shots
Short shots happen when the mold does not fill all the way. You might see missing corners or incomplete shapes. Thin walls or blocked vents can cause this. To fix short shots, increase the mold temperature and add more venting. Make sure the plastic flows easily by checking the injection pressure and speed. Use a wall thickness that lets the plastic fill the mold before it cools.
Flash
Flash is extra plastic that leaks out of the mold and forms thin edges on your part. You can stop flash by making sure the mold closes tightly. Check for wear or damage on the mold. Adjust the injection pressure so it does not force plastic out of the mold. Clean and maintain the mold to keep the edges sharp.
Tip: Always inspect your raw materials. Dry them well and keep them clean. This helps you avoid many defects before you even start molding.
Design Considerations
Wall Thickness
Wall thickness is very important in injection molding. If the walls are too thick, you get sink marks and warping. If they are too thin, you get short shots. Keep the wall thickness uniform and within the recommended range for your material. Use gradual changes between thick and thin areas. This helps the plastic flow and cool evenly.
Draft Angles
Draft angles help you remove the part from the mold. Add a draft angle of 0.5° to 1.5° on vertical walls. For textured surfaces, use a larger angle. Draft angles prevent scratches and make ejection easier. They also reduce stress on your part and the mold.
Ribbing
Ribs make your part stronger without making it heavy. Design ribs to be 60-80% of the wall thickness. Place them where you need extra support. Avoid making ribs too thick, or you will get sink marks. Use smooth transitions between the rib and the wall.
| Design Feature | Best Practice |
|---|---|
| Wall Thickness | 1.2–3.0 mm, uniform throughout |
| Draft Angle | 0.5°–1.5°, more for textured parts |
| Rib Thickness | 60–80% of the wall thickness |
Mold Maintenance
You must take care of your mold to keep making good parts. Clean the mold after every production run. Remove leftover plastic and check for damage. Lubricate moving parts to stop wear. Inspect for cracks, chips, or alignment problems. Keep records of all maintenance and repairs. Use advanced tools like sensors to watch mold temperature and cooling. This helps you fix problems before they get worse. Good mold maintenance means less downtime and better quality parts.
Note: Regular maintenance and careful design help you avoid most defects in injection molding. You save time, money, and get better results every cycle.
Quality Control
You need strong quality control to make sure your injection molded parts meet high standards. Good quality control helps you catch problems early and keeps your products safe and reliable. You should check every step, from mold design to packaging.
Start with your mold design. Make sure the surfaces match up well and the sealing areas are the right size. For small and medium molds, sealing should be between 10 and 20 mm. For large molds, use 30 to 50 mm. Keep the wall thickness even, with differences less than ±0.15 mm. Ribs should be less than 60% of the wall thickness. Fix cores and sliders tightly so they do not move during molding.
During production, control your process settings. Keep injection pressure below 85% of your machine’s maximum. Set the injection speed between 10% and 90% of the maximum for most of the stroke. The hold pressure should also stay below 85%. Clamping force should not go over 90%. Remove parts and sprues quickly, in less than 2 seconds, to keep the process moving and reduce wear.
You must also check the finished parts. Use these benchmarks:
- Keep dimensional tolerances between ±0.1 mm and ±0.5 mm. For very precise parts, aim for ±0.05 mm.
- Check surface finish using Ra values from 0.1 to 3.2 micrometers. Look for defects like sink marks or flow lines.
- Make sure warpage does not go over 0.1 mm for every 25 mm of length.
- Test material properties like strength and impact resistance using standard tests.
- Sort visual defects into critical (none allowed), major (up to 1.0% allowed), and minor (up to 2.5% allowed).
- Keep part weight within ±2% of the target.
- Do not allow flash on visible or working surfaces. In non-critical areas, small flash up to 0.1 mm may be okay.
You should follow global standards like ISO 9001 and ISO 13485. These standards help you set up a system for quality management. They focus on customer needs, leadership, teamwork, and using data to improve. For medical parts, ISO 13485 adds extra checks for safety and process control.
Before shipping, clean the mold, spray anti-rust, and lubricate moving parts. Seal all inlets and outlets. Use packaging that protects against water, moisture, and shocks. This reduces damage during transport by up to 90%.
Tip: Keep good records of your checks and tests. This helps you find problems fast and keeps your process running smoothly.
Safety
You must always think about safety when working with injection molding. The machines use high heat and strong pressure. If you do not follow safety rules, you can get hurt or damage equipment.
Wear the right personal protective equipment (PPE). Use heat-resistant gloves, safety glasses, and long sleeves. These protect you from burns and flying plastic. Always keep your hands away from moving parts, especially the mold area.
Check your machines before you start. Make sure all guards and safety switches work. Never bypass safety devices. If you see a problem, stop the machine and tell your supervisor.
Keep your work area clean and dry. Spills can cause slips and falls. Clean up plastic pellets right away. Store tools and materials in their proper places.
Follow lockout/tagout procedures when you clean or repair machines. This means you turn off the power and lock the controls so no one can start the machine by accident.
Train everyone on your team about safety rules. Review emergency plans often. Know where the fire extinguisher and first aid kit are.
Remember: Safety is everyone’s job. When you follow safety steps, you protect yourself and your team. Safe work means better results and fewer accidents.
Applications
Automotive
Injection molding is used a lot in making cars. Car companies use it to make parts that are light and strong. Parts like dashboards, bumpers, and engine covers are made this way. Even battery cases for electric cars use injection molding. These parts must be tough but not heavy. Lighter cars use less gas.
Factories use new thermoplastics and machines that work by themselves. This helps them make parts faster and with fewer errors. Machines can make each part in less time, about 20% faster. Designers use computers to help plan parts that fit well and last longer.
| Application | Benefit |
|---|---|
| Dashboards | Lightweight, precise fit |
| Bumpers | Impact resistance, durability |
| Engine covers | Heat resistance, strength |
| EV battery casings | Complex shapes, safety |
| Electrical parts | Insulation, reliability |
Injection molding helps car makers make many parts and save money. The market for these car parts is growing quickly. New materials and better machines make the process even better.
Electronics
You use electronics every day at home and at school. Injection molding shapes many parts inside your devices. Companies use it to make strong and light cases for phones and computers. These cases protect the inside parts and keep them cool.
Special plastics that are tough and can withstand heat work best for electronics. Factories can make thousands of the same part very fast. This keeps prices low and quality high. Injection molding is also used for connectors and switches.
- Cell phone bodies and cases
- Wifi router housings
- Cable connections and connectors
These parts must be safe and work well. Some plastics do not carry electricity and stop static. This keeps your devices safe. The process lets you make cool shapes and colors, so your electronics look nice and work great.
Medical
Injection molding is very important in hospitals and clinics. It is used to make things like syringes, pill bottles, and catheter parts. Special plastics like polyethylene and polycarbonate are safe for people. They can be cleaned in many ways to stay germ-free.
You need to make lots of medical items, like test swabs and tools you throw away after one use. Injection molding makes this easy. It can also make small and tricky shapes, which are needed for things like implants and drug devices.
- Surgical instruments
- Diagnostic equipment
- Drug delivery devices
- Implantable parts
- Sterile packaging
Doctors and nurses use these products every day. Injection molding makes sure each item is clean, safe, and not too expensive. Factories can make more items quickly when there is a big need, like during a health emergency.
Tip: Injection molding lets you make special medical tools that cost less and work well. This is why it is so important in healthcare today.
Packaging
You see packaging made by injection molding almost everywhere. When you open a water bottle or yogurt tub, you use these products. Injection molding makes packaging strong, safe, and nice to look at.
You can make many kinds of packaging with this process. Some examples are:
- Bottle caps and closures
- Food tubs and containers
- Cosmetic jars and lids
- Medicine bottles
- Coffee pods for one cup
- Measuring scoops and spoons
Factories like injection molding because it is fast and cheap. Every package comes out the same size and shape. This keeps your food and drinks safe and fresh. You can add things like child-proof caps or seals that show if opened.
| Packaging Product | Key Features | Typical Material |
|---|---|---|
| Bottle Caps | No leaks, easy to open | Polypropylene (PP) |
| Yogurt Cups | Safe for food, easy to stack | Polystyrene (PS) |
| Cosmetic Jars | Clear, stylish, keeps air out | Polycarbonate (PC) |
| Medicine Bottles | Hard for kids, very strong | High-Density PE (HDPE) |
| Coffee Pods | Handles heat, sealed tight | Polypropylene (PP) |
You can pick from many plastics for your packaging. Some plastics block air and water. Others let you see what is inside. You can choose colors, shapes, and finishes to make your package look special.
Tip: To use less plastic, make thinner walls, or use recycled plastic. Many companies use eco-friendly plastics to help the Earth.
Injection molding lets you make lots of packages at once. You can make millions of caps or tubs each month. This helps you meet demand and save money. The process uses almost all the material, so there is little waste.
You can trust injection molding for safe and strong packaging. Food, medicine, and makeup all need good packaging to stay safe. You can follow safety rules and keep customers happy.
When you plan new packaging, think about injection molding. You will get strong, safe, and nice-looking packaging that works for you.
You now know the main steps and safety tips for injection molding. When you learn these basics, you can make better products. You can also avoid many common mistakes. Many companies use scientific molding to make parts better. They also use real-time controls to save money.
- Scientific methods help you make fewer mistakes and keep parts the same.
- If you know about material properties, you can pick the best plastic.
- Watching machines in real time helps you fix problems faster.
| Next Steps | Resource |
|---|---|
| Learn process fundamentals | PMC Article |
| Explore advanced methods | Stanek et al., 2011 |
| Discover new applications | Heaney & Greene, 2019 |
Tip: Keep learning and ask experts for help. This will help you get great results every time.
FAQ
What is the main cost in injection molding?
The mold makes up most of your cost. You pay a lot at the start to create the mold. After that, each part costs much less. You save more money when you make many parts.
How do you prevent defects in injection molding?
You keep defects away by using the right temperature, pressure, and cycle time. You should also check your mold for damage. Clean your materials and follow design rules for wall thickness and draft angles.
Can you use recycled plastic in injection molding?
Yes, you can use recycled plastic. Many factories mix recycled pellets with new ones. This helps you save money and protect the environment. Always check if the recycled material fits your product needs.
What plastics work best for injection molding?
You can use many plastics. Common choices include ABS, PP, PE, and PC. Each plastic has special strengths. Pick one that matches your product’s needs for strength, safety, and cost.
How do you choose the right mold design?
You look at your part’s shape, size, and use. Keep the wall thickness even. Add draft angles for easy removal. Use ribs for strength. Work with experts to make sure your mold fits your needs.
Is injection molding safe for making medical parts?
Yes, you can make safe medical parts with injection molding. Use medical-grade plastics. Follow strict cleaning and quality checks. This keeps your products safe for doctors and patients.
How fast can you make parts with injection molding?
You can make parts very quickly. Most cycles take less than a minute. Automated machines help you produce thousands of parts each day. This speed makes injection molding great for big orders.
Tip: Always test your first parts before full production. This helps you catch problems early and save time.