What is Silicone Mold Making?
Silicone mold making is a technique used to create duplicates of an object. The process begins with an original model. Next, liquid silicone is mixed with a curing agent and applied—either by pouring or brushing—onto the model’s surface until it is fully covered. The silicone then cures naturally at room temperature, forming a soft and flexible mold.
The interior of the cured silicone mold will precisely replicate every detail of the original model. After that, you can inject other materials into the cavity of this mold, such as resin, gypsum, cement, or candle wax. After these materials have cooled or solidified, due to the flexibility of the silicone, you can easily remove the finished product from the mold, thus obtaining a high-precision replica exactly the same as the original model.
Basic Principles Behind Silicone Mold Creation
The basic principle of making silicone molds is to replicate the shape of objects with liquid silicone and form reusable elastic molds through curing. This transformation characteristic from fluid to elastomer enables silicone molds to precisely replicate complex shapes and ensure smooth demolding.
Types of Silicone Used for Mold Making
What Is Tin-Cure Silicone?
Tin-cured silicone is the most common and cost-effective choice, making it ideal for beginners and general hobby projects. Their operation is relatively simple, and they usually cure at room temperature.
Tin-cured silicone gel undergoes a curing reaction by absorbing moisture from the air. They are usually single-component or two-component systems.
Pros:
- Lower cost
- Insensitive to inhibitors
- High operational tolerance
Cons:
- Significant curing shrinkage
- Reduced mould service life
- Poor heat resistance and physical properties
What Is Platinum-Cure Silicone?
Platinum-cured silicone rubber is the preferred choice for professional applications and high-precision work. This type of silicone has an extremely low shrinkage rate and can achieve extremely high dimensional stability and detail reproduction.
Platinum-cured silicone gel cures through an addition reaction between the silicone gel body and the platinum catalyst, without releasing any by-products.
Pros:
- Extremely low shrinkage rate
- Superior physical properties
- Safe and environmentally friendly
Cons:
- Relatively high cost
- Prone to contamination by certain substances
- Requires more stringent operating conditions
Your First Mold: A Step-by-Step Guide to a One-Part Mold
Step 1: Preparing Your Model and Mold Box
Molds and mold boxes are crucial steps in the entire process, directly determining the success or failure of the final mold.
You need to select a model with a smooth and flawless surface and seal it with sealant or model paint to prevent silicone from seeping into the pores and ensure a smooth demolding process later on. Then, based on the shape and size of the model, select or make a mold box that is large enough to accommodate the model and has sufficient margins, ensuring that the model is firmly fixed at the bottom or center of the mold box to prevent displacement during the pouring of silicone.
Step 2: Measuring and Mixing Your Silicone Perfectly
Precise proportioning and thorough mixing are the foundation for ensuring the normal curing of silicone. Any mistake may result in the mold part not curing or a decline in performance. You must strictly follow the weight or volume ratio specified by the manufacturer and use an accurate electronic scale or measuring cup to weigh the silicone base material and curing agent.
When mixing, clean containers and tools should be used. Stir slowly and thoroughly in the same direction to ensure that the materials at the bottom and on the walls are evenly mixed. Usually, it takes several minutes until the color is completely consistent and there are no streaks.
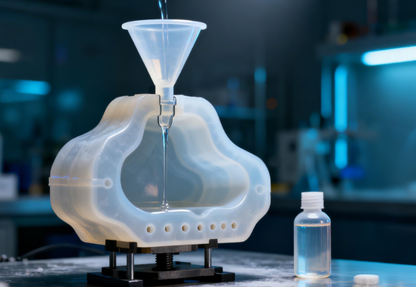
Step 3: Pouring Techniques to Minimize Bubbles
Bubbles are the most common defect in silicone molds and can directly replicate onto your final castings, so special techniques are needed to avoid them.
An effective method is to pour the mixed silicone from a lower height into the mold box in a long, continuous stream. It is best to first pour it in a corner beside the model, allowing the silicone to naturally and smoothly cover the model. This can force the air to be expelled from the other end. For applications with extremely high requirements, using a vacuum defoamer to remove bubbles from the silica gel after mixing is the most reliable professional method.
Step 4: Curing and Demolding for a Perfect Finish
Any premature handling can damage a partially cured mold, causing tears or warping. Place the filled mold box on a level, vibration-free surface and strictly adhere to the manufacturer’s specified curing time and temperature.
Never demold when the surface feels solid—wait for complete through-curing. During demolding, first remove the mold box carefully, then gently stretch the silicone mold’s edges to release it gradually from the model. Avoid using force.
Advantages of Silicone Mold Making
Superior Detail Reproduction
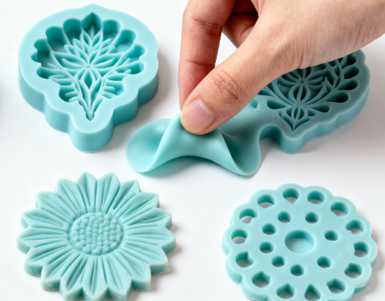
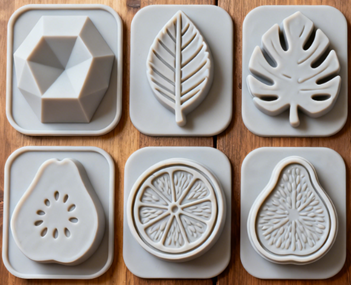
Liquid silicone’s excellent fluidity allows it to penetrate and cover even the finest textures and most complex structures on a prototype. Once cured, it perfectly replicates these intricate details—from sculpted hair strands and leaf veins to metal engravings—with remarkable precision.
This high-fidelity reproduction makes silicone the preferred material for replicating artworks, jewelry, and precision components, an advantage few other molding materials can match.

Easy Release & Flexibility
The mold formed after the silicone cures is soft and elastic, which enables it to be easily peeled off from prototypes with upside-down or complex geometry shapes without damaging the mold or the casting itself.
For complex structures that rigid molds cannot handle, silicone molds can achieve perfect demolding through bending and stretching, greatly expanding the design range of replicable objects and also extending the service life of the molds, as they can withstand repeated bending without cracking easily.
Broad Material Compatibility
Silicone molds themselves have stable chemical properties and can be safely used in combination with many casting materials without adverse reactions. Whether it is epoxy resin, polyurethane resin, low-temperature gypsum and concrete, or soap base for making soap and wax for making candles, it can handle all of them.
The versatility of silicone enables creators to avoid frequently changing mold types for different projects. A single silicone mold solution can meet a wide range of needs, from handicrafts to industrial prototype production.
Long-Term Durability
High-quality silicone molds have extremely strong tear resistance and wear resistance, and can withstand dozens or even hundreds of repeated pouring cycles.
Compared with disposable molds or other soft molds with a shorter lifespan, although the initial cost of silicone molds may be slightly higher, their long service life makes the cost per use very low. This is highly economically viable for small-batch production or projects that require the creation of multiple identical replicas.
Simple & Safe
Especially for handcrafted room-temperature curing silicone, it is usually only necessary to mix components A and B in proportion, without the need for complex heating equipment or high-pressure environments.
Compared with some industrial mold-making processes, silicone molds have lower entry barriers and operational risks, making them highly suitable for DIY enthusiasts and artists in studio and home Settings. In addition, there are many non-toxic and odorless food-grade silicone products on the market that can be directly used to make candy and chocolate molds, ensuring the safety of application.
One-Piece vs. Two-Piece Silicone Molds
One-Piece Silicone Mold
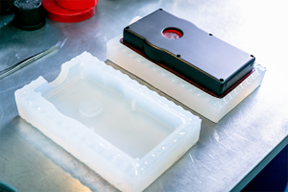
One-piece silicone molds, also known as block molds, are the simplest form. It completely embeds the entire model into a single silicone block. When making it, the model is fixed in a mold box and then directly covered with silicone. This kind of mold usually only has one gating opening at the bottom or on the side.
Two-Piece Silicone Mold
Two-piece silicone molds are used to replicate complex three-dimensional models with all-around details or obvious overhangs. It is composed of two independent silicone parts, which are precisely aligned in the middle by positioning keys.
One-Piece Silicone Mold vs. Two-Piece Silicone Mold
| Feature | One-Piece Silicone Mold | Two-Piece Silicone Mold |
| Best For | Simple, flat-backed objects with no undercuts (e.g., relief plaques, coins, pendants). | Complex, fully 3D objects with undercuts or intricate details on all sides (e.g., figurines, spheres, complex parts). |
| Advantages | – Faster and easier to make.
– Uses less silicone material. – Ideal for quick, simple castings. |
– Can capture highly complex geometries.
– Allows for easy demolding of intricate parts without damage. – Essential for true 3D reproduction. |
| Disadvantages | – Cannot be used for objects with undercuts.
– Limited to simpler shapes. |
– More time-consuming and technically challenging to create.
– Requires more silicone and other materials. – Involves creating a precise parting line and registration keys. |
| Demolding | The casting is pulled directly out of the single opening of the mold. | The two halves of the mold are separated to release the casting. |
Expert Tips and Common Troubleshooting
Mold Preparation
Before making the mold, the original model must be thoroughly processed. Apply water-based sealant or model primer evenly to the model surface, especially for porous materials such as wood, gypsum, or 3D printed parts. This step can effectively seal the pores, prevent silicone from seeping in, thereby avoiding mold tearing during demolding and ensuring a smooth surface of the casting.
Precise Mixing
Weigh the silicone base material and curing agent strictly in accordance with the proportion recommended by the manufacturer, using an electronic scale instead of visual inspection. Even a tiny proportion error may lead to incomplete curing or a decline in mold performance.
When mixing the materials, be sure to use a clean container and stir for at least three to five minutes using the “same direction, slow speed, and scraping edge” technique until the color is completely uniform and there are no streaks. Only in this way can the chemical reaction be ensured to be thorough and consistent.
Bubble Prevention
After mixing, let the silicone stand for a few minutes to allow most of the large air bubbles to float naturally to the surface and burst. When pouring, the silicone should be poured from a lower height, allowing it to fall in a slender streamline to the corner beside the model instead of directly impacting the model. The fluidity of the silicone is utilized to provide a path for the bubbles to be pushed out.
Mold Release
Even when the silicone itself does not stick to the model, it is a good habit to apply a thin layer of mold release agent. Mold release agents can serve as an additional safeguard, significantly reducing the risk of mold release failure, especially when using two-piece molds or models with complex details.
Please note that for platinum silicone, it is essential to ensure that the model and tools do not come into contact with materials containing sulfur or other substances that inhibit curing; otherwise, it will cause the mold surface to become sticky and unable to cure.
Patient Curing
Place the cast mold in a level, vibration-free, and temperature-stable environment to allow for proper curing. It is strictly forbidden to increase the ambient temperature at will in an attempt to speed up the process, as this may lead to excessive curing, causing stress or the formation of bubbles.
Be sure to follow the curing time specified in the product instructions. Even if the surface feels cured, it is best to wait for it to complete deep curing. Only in this way can the mold achieve the best physical properties and service life.
Common Silicone Mold Making Problems
Excessive Air Bubbles
Bubbles can directly affect the surface of castings, causing defects. The cause is that air was trapped when the silicone was mixed and poured. The solutions include: mix and let the silica gel stand to allow the large air bubbles to float to the surface; Pour slowly from a corner of the mold box at a low position to allow the silicone to spread naturally and push away the air. The most effective method is to use a vacuum machine for vacuum treatment.
Mold Tearing
If the tear resistance of the silicone itself is insufficient, it is prone to being pulled apart when demolding complex parts. In addition, forcibly demolding a single piece of mold from a model with an upside-down part or excessively shaking the mold when pouring hard materials can both cause damage.
The solution is to choose silicone with high tear resistance based on the complexity of the model. For models with upside-down down, it is essential to make a two-piece mold and be patient and gentle when demolding.
Mold Warping
Mold deformation may be due to the model not being fixed properly during the manufacturing process, resulting in displacement. Or the silicone mold itself is too soft. When pouring heavier materials such as resin, it deforms due to the lack of external rigid support.
The solution is to ensure that the model is firmly fixed in the mold box and to make a sturdy “master mold” or cover for the soft silicone mold to support its shape.
Poor Detail Reproduction
If the finished mold cannot perfectly replicate the fine texture of the model, the reason might be that the viscosity of the silicone is too high to fully flow into the tiny depressions. Or the model itself is made of porous material and has not undergone sealing treatment, absorbing silica gel.
Low-viscosity and well-flowing silicone should be selected to make molds with complex details, and the models must be thoroughly sealed before production.
Silicone Mold Making vs. 3D Printing Molds: Which Is Better?
Silicone Mold Making
Suitable for producing small batches of high-quality replicas from a single original model.
Pros:
- High level of detail reproduction
- Wide variety of materials
- Significant advantages in demoulding
Cons:
- Lengthy production cycle with multiple steps
- High per-unit cost
- Reliance on the original model
3D Printing Molds
Suitable for rapid design validation, small-batch injection moulding, or the production of rigid moulds.
Pros:
- Extremely rapid
- High design flexibility
- Digitalisation and consistency
Cons:
- Surface texture
- Difficult to demould
- Poor material compatibility
Common Applications for Silicone Molds Making
Prototyping
Silicone molds are often used for prototype replication during the product development stage and can quickly obtain samples with highly consistent details with the original. Its production cycle is short, and the cost is low, making it suitable for verifying appearance, structure, and assembly. It can help engineers quickly iterate on the design before the official mold opening, significantly shortening the R&D cycle.
Low-Volume Production
Silicone molds are suitable as a transitional process before injection molding and are used for small-batch production of dozens to hundreds of pieces.
Silicone has excellent tear resistance and flexibility, and can be reused. It offers an economical and low-cost production method for start-ups and customized products, making it highly suitable for low-budget projects.
Food Molds
Food-grade silicone is safe and non-toxic, and can be used to make chocolate molds, cake molds, ice cube molds, and sugar art molds etc. Silicone is heat-resistant, easy to clean, and has a smooth and non-stick surface. It can maintain the shape and details of food, bringing great convenience and flexibility to home baking and pastry production.
Jewelry
Jewelry designers often use silicone molds to replicate wax models, resin models, etc., for modeling before metal casting.
Silicone can capture very fine textures and shapes, allowing complex carving details to be fully preserved. It is one of the important techniques in jewelry making and artistic sculpture.
Medical & Scientific Models
Silicone is soft, non-toxic, and highly realistic. It is often used to make human tissue models, organ models for teaching, and the shells of medical equipment.
Silicone molds can generate highly simulated structures, facilitating medical students’ learning and doctors’ surgical training. They are common materials in scientific research and education.
Your Reliable Silicone Mold Making Service Provider
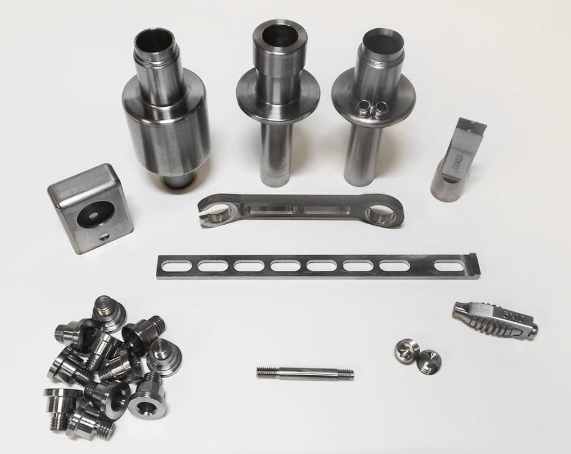
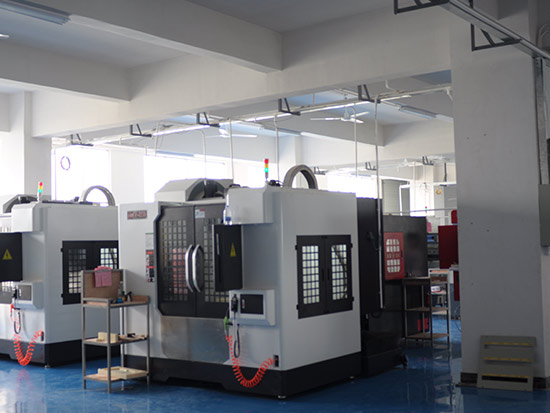
Need mold-making supplies for mass-producing parts? NOBLE is known as the best mold maker in China. We have advanced mold manufacturing equipment and excellent partners. We can provide injection molds for hard plastic, rubber, and silicone, metal injection molds for various precision stainless steel parts, and die-casting molds for aluminum, magnesium, and zinc. NOBLE is lower than the market price, strictly controls the quality of mold production, improves the supply chain, and solves all needs in one stop.
Whether you need prototype tooling for low-volume production or mass-production tooling requiring millions of runs, NOBLE has it covered.
- 10+ years of Mold Making
- 24/7 Engineering Support
- Instant Mold Making Quotes
- Free Dimensional Inspection Reports
- ISO 9001 & ISO13485 Certified Factory
- Advanced Equipment & Cost-Effective Price
FAQ
Can I Make a Silicone Mold of Another Silicone Mold?
Technically, yes, but it is generally not recommended and often problematic. The new silicone will bond chemically with the original mold, causing them to fuse together permanently. Furthermore, each new generation mold will lose some detail and accuracy from the previous one.
What is the Best Silicone for Making Resin Molds?
The best silicone for making resin molds is, without a doubt, a Platinum-Cure Silicone Rubber. This type is preferred because it offers superior performance for this specific application. Platinum silicone cures with extremely low shrinkage, ensuring your resin castings are dimensionally accurate and capture every fine detail.
How long does a Silicone Mold Last?
The lifespan of a silicone mold depends heavily on the type of silicone and how it is used. A general range is from 20 to over 100 castings. Tin-Cure (condensation cure) molds are less durable and may last for 20-50 copies before showing significant wear, like tearing or distortion.
Is Silicone Mold Making Expensive to Start?
Silicone mold making is a relatively accessible hobby to begin. You can start with a basic toolkit for around $50 to $100. This initial investment would cover a small bottle of silicone (tin-cure is a cheaper entry point), a mold box, mixing cups, sticks, and a simple model. It is not a prohibitively expensive craft. However, costs can rise if you pursue larger projects, require high-detail platinum silicone, or invest in professional equipment like a vacuum chamber for bubble removal.